Pages

Braniac Bhai Headline Animator

Search This Blog

Jun 14, 2011

Trick to Activate GodMode In Windows 7 And Vista

Trick to Activate GodMode In Windows 7 And Vista


If you are using windows vista or windows 7 then you should be aware of Godmode. If you are not aware about the Godmode then in this post I will explain to you what is godmode and how it can be activated in windows 7 and windows vista.
Godmode provides you with a shortcut icon where you can customize all your settings from mouse settings to display settings. This is very convenient as it provides all the options at one single place and activating godmode is also very simple and require only two simple steps.

Here is the Step by Step tutorial with screenshots to Activate godmode in windows 7 and windows Vista

How To Remove “Error Deleting File or Folder”

How To Remove “Error Deleting File or Folder”


It is a very common and annoying message that the file or folder you are trying to deleted cannot be deleted or thependrive cannot be removed as it is used by the system. In this tutorial I will show how to remove your pendrive or delete the files and folders if you get such an error. This error has various flavours and it can be of any of the following types:
  • Cannot delete file: Access is denied
  • There has been a sharing violation.
  • The source or destination file may be in use.
  • The file is in use by another program or user.
  • Make sure the disk is not full or write-protected and that the file is not currently in use.

Here is the step by step tutorial with screenshots on How To Remove “Error Deleting File or Folder”

How To Install Windows Xp, Vista And 7 From Usb

How To Install Windows Xp, Vista And 7 From Usb


You can install any version of windows like windows xp, vista, 7, 2003, 2008 using usb drive. As usb have become very common and affordable these days everbody caaries a usb. This tutorial doesnot uses the command prompt method for installing windows from usb instead I will give you a new and a simpler method to install the windows from the usb drive. For this tutorial we will require the following things.
  • Windows Dvd or it’s ISO image
  • Optical drive emulation software( like demon tools)
  • Wintoflash software
  • USB drive (minimum 4 gb)
All the software that we will be using in this tutorial are free and their downloads links are given in the post.

Here is the step by step tutorial with screenshots on How To Install Windows Xp,Vista And 7 From Usb

Trick To Enable/Unlock Hidden Themes In Windows 7

Trick To Enable/Unlock Hidden Themes In Windows 7


Windows 7 has been a real delight for the eyes due to its excellent graphics. By defualt Windows 7 has 5 themes enabled for all countries but there are additional themes which are country specific and enabled according to your demographic location.In this tutorial I will show you how to enable/unlock the country specific hidden themes in windows 7. Once enabled these themes will always be available to you. There are two ways to enable these hidden themes. I will explain both of them to you and you can use any one of them whichever you find easy.

Here is the step by step tutorial with screen shots on how to Enable/Unlock Hidden Themes In Windows 7


Method 1:-

1. Go to Control Panel.
2. Click on Folder Options.

Jun 12, 2011

How to Configure EIGRP With RIP On Same Network

How to Configure EIGRP With RIP On Same Network


In this article we will discuss how can two routing protocols exist in same network? We have discussed basic of both EIGRP and RIP in our pervious article. Now we will go in more depth by including both RIP and EIGRP in same network.

Scenario

You are the administrator at http://earnkori.blogspot.com. Company network is given below,


R0
PortIP addressConnected to
F0/080.0.0.1R1   F0/1
F1/090.0.0.1R2 F0/1
F1/1100.0.0.1R3 F0/1


R1
PortIP addressConnected to
F0/0.1010.0.0.1S1 F0/24
F0/0.2020.0.0.1S1 F0/24
F0/180.0.0.2R0 F0/0
S0/0/030.0.0.1R2 S0/0
R2
PortIP addressConnected to
F0/190.0.0.2R0 F1/0
S0/030.0.0.2R1 S0/0/0
F0/040.0.0.1WR1 0/1
S0/150.0.0.1R3 S0/0/1
R3
PortIP addressConnected to
F0/1100.0.0.2R0 F1/1
S0/0/150.0.0.2R2 S0/1
F0/0.6060.0.0.1S1 G0/1
F0/0.7070.0.0.1S1 G0/1

IP address and other necessary configurations are already done on routers, switches, and on pc's, you need only to configure routing.

How to Configure Open Shortest Path First Routing Protocol

OSPF Routing Configurations


In this article I will demonstrate an example of OSPF Routing configurations. We will use four different series router so you can get familiar with all different platform covered in CCNA exam. Create a topology as shown in figure.


Configuring OSPF is slightly different from configuring RIP. When configuring OSPF, use the following syntax:
Router(config)# router ospf process_ID
Router(config-router)# network IP_address wildcard_mask
area area_#

Open Shortest Path First OSPF Protocols Description Notes Tutorials Guide

OPEN SHORTEST PATH FIRST(OSPF)


 Biggest advantage of OSPF over EIGRP is that it will run on any device as its based on open standard

Advantages

  • It will run on most routers, since it is based on an open standard.
  • It uses the SPF algorithm, developed by Dijkstra, to provide a loop-free topology.
  • It provides fast convergence with triggered, incremental updates via Link State Advertisements (LSAs).
  • It is a classless protocol and allows for a hierarchical design with VLSM and route summarization.

Disadvantages:

  • It requires more memory to hold the adjacency (list of OSPF neighbors), topology and routing tables.
  • It requires extra CPU processing to run the SPF algorithm
  • It is complex to configure and more difficult to troubleshoot.

Hide Folders In Symbian/Java Phones Without Software

Hide Folders In Symbian/Java Phones Without Software


Have you ever wanted to hide folders in your phone? If yes,there here is very interesting solution for you to hide folders in your phone without the need of any software. This trick can be used for phone from Nokia,Samsung,Motorola,LG or any other company. The only requirement is that your phone should support java which almost all mobile phones support now.

How to Configure Enhanced Interior Gateway Routing Protocol

EIGRP Routing Configurations


EIGRP is a Cisco-proprietary routing protocol for TCP/IP. It’s actually based on Cisco’s proprietary IGRP routing protocol, with many enhancements built into it. Because it has its roots in IGRP, the configuration is similar to IGRP; however, it has many link state characteristics that were added to it to allow EIGRP to scale to enterprise network sizes. To know these characteristics read our pervious article.

In this article I will demonstrate an example of EIGRP Routing configurations. We will use four different series router so you can get familiar with all different platform covered in CCNA exam. Create a topology as shown in figure.


How to Use Mobile Camera As Webcam

How to Use Mobile Camera As Webcam


Now A days everybody owns a mobile phone with camera. And it is really interesting and simple to use your mobile phone camera as web-cam for your yahoo, gtalk or any other messenger. So if you don't have a web-cam & doesn't want to waste money on buying a new one then this is the best solution for you. For using your mobile camera as a web-cam you need to have a symbian mobile phone or a windows mobile phone as the application that we will be using only works on the symbian or windows platform.

Jun 10, 2011

Enhanced Interior Gateway Routing Protocol Configurations

Enhanced Interior Gateway Routing Protocol (EIGRP)


EIGRP is the advance version of Cisco’s earlier version IGRP. Before you learn more about EIGRP let be familiar with IGRP.

Interior Gateway Routing Protocol (IGRP)

The Interior Gateway Routing Protocol (IGRP) is a Cisco-proprietary routing protocol for IP. it is a distance vector protocol.
  • It uses a sophisticated metric based on bandwidth and delay.
  • It uses triggered updates to speed-up convergence.
  • It supports unequal-cost load balancing to a single destination.
IGRP is Cisco proprietary uses bandwidth, delay, reliability, load, and MTU as its metrics (bandwidth and delay be default).
IGRP's routing update period is every 90 seconds. Its hold-down period is 280 seconds, and its flush period is 630 seconds.
It also supports triggered updates and load balancing across unequal-cost paths.
IGRP requires an AS number in its router command; plus, when entering network numbers for the network command, they are entered as the classful network number, as they are for RIP.
IGRP supports both equal- and unequal-cost paths for load balancing to single destination Equal-cost paths are enabled by default, where IGRP supports up to six equal-cost paths (four by default) to a single destination in the IP routing table. IGRP, however, also supports unequal-cost paths, but this feature is disabled by default.

Routing information protocol RIP Description Notes Tutorials Guide

Routing Information Protocol RIP


Routing Information Protocol (RIP) is a standards-based, distance-vector, interior gateway protocol (IGP) used by routers to exchange routing information. RIP uses hop count to determine the best path between two locations. Hop count is the number of routers the packet must go through till it reaches the destination network. The maximum allowable number of hops a packet can traverse in an IP network implementing RIP is 15 hops.

It has a maximum allowable hop count of 15 by default, meaning that 16 is deemed unreachable. RIP works well in small networks, but it's inefficient on large networks with slow WAN links or on networks with a large number of routers installed.

In a RIP network, each router broadcasts its entire RIP table to its neighboring routers every 30 seconds. When a router receives a neighbor's RIP table, it uses the information provided to update its own routing table and then sends the updated table to its neighbors.

How to configure Routing Information Protocol RIP routing

Rip Routing Configurations


In this article I will demonstrate an example of Rip Routingconfigurations. We will use four different series router so you can get familiar with all different platform covered in CCNA exam. Create a topology as shown in figure.


IP RIP comes in two different versions: 1 and 2. Version 1 is a distance vector protocol and is defined in RFC 1058. Version 2 is a hybrid protocol and is defined in RFCs 1721 and 1722. The CCNA exam now primarily focuses on version 2. There are no major differences between RIPv1 or RIPv2 so far configurations concern. To read more about differences between RIPv1 or RIPv2 or know about the characteristics read our pervious article about RIP.

Tips And Tricks To Change Font Of Nokia Mobile

Tips And Tricks To Change Font Of Nokia Mobile


Changing  fonts on nokia Symbian phone is a very easy task. It only takes 2-5 minutes. There are various tips and tricks available to change your font on nokia phones but we are providing you the easiest methods with proper screenshots so that you donot face any problems while using these font changing tips and tricks. These tricks have been tested on nokia n95, 5800, n73 and should be compatible with all other nokia symbian phones. Some sample fonts are also provided in this tutorial along with their screenshot. You can also use your own fonts.
So, lets start the step by step tutorial for changing the font of your nokia mobile phone.


1. If you want to use your custom font in your nokia mobile then create a new folder in your computer desktop and name it as “fonts “.

2. Now go to c:/windows/fonts in your computer and copy the font you want to use .

3. Paste this font in the fonts folder created on the desktop.


4 Websites To Send Anonymous SMS Without Registration

4 Websites To Send Anonymous SMS Without Registration


There are a lot of websites on the Internet that provides free sms services but only handful of them allows you to send Sms without registration and anonymously. In this post I will review the services of 4 Sms websites that allows you to send Anonymous messages.


Tricks To Reset Memory Card Password In Nokia

Tricks To Reset Memory Card Password In Nokia


If you have a symbian phone and you have forgotten your memory card then you can easily get your password by using this simple trick. This trick works only on nokia symbian phones not on the java phones. Before starting the tutorial on “Tricks To Reset Memory card Password In Nokia” Here are the the requirements
The X-plore application is used to view the data files of the phone.

Tips And Tricks To Speed up windows 7

Tips And Tricks To Speed up windows 7


With the launch of windows 7 we have witnessed one of the fastest operating system by Microsoft. But still there are people who want more and more!.

This article is for all those people who want to increase the performance/speed of their windows 7 operating system.

We are not providing here any softwares for this purpose we are just giving you tips and tricks to tweak your windows 7 according to your needs and you will certainly get your desired performance from your windows 7 operating system.

Here is the step by step tutorial with screenshots on how to increase your windows 7 speed.


1. Disable Startup Services
Windows startup services can be found by clicking on start and the and typing “ msconfig ” and pressing enter. Now click on services tab. Now you can disable the unwanted services by checking them and clicking on disable. While this should be done according to your requirements.Services like “Offline Files,” “Tablet PC Input Services,” Terminal Services,” “Fax” and “Windows Search. “Offline Files,” “Tablet PC Input Services,” Terminal Services,” “Fax” and “Windows Search have a large impact on windows 7 speed/performance.

2. Utilize Readyboast
Microsoft introduced readyboast service with the launch of windows vista and continued the service in windows 7. In ready boast service whenever you plugin your pendrive into your computer you will get an option to use your pendrive to speed up your windows 7 or windows vista. It will increase your windows memory. By using ready boast you can also specify how much memory of the pendrive should be used to speed up your windows 7.

3.Disable Windows transparency
Disabling the windows 7 transparency option will certainty give a good speed to your windows 7 speed/performance. Disabling transparency is very easy in windows 7. Simply right-click on your desktop, select “Personalize,” choose the active theme and then navigate to “Windows Color.” Finally, uncheck the “Enable Transparency” option.

4.Remove Unwanted Programs from Startup
Disabling unwanted programs such as messengers or other programs from startup will not only increase speed of your windows 7 it will also decrease the startup time of windows 7.

5.Disable Unwanted Features Of Windows 7
To disable unwanted features from windows 7 click on “ Start “ then on control panel. Now click on “ Programs “ then on “Turn Windows features on or off”. Now disable the features you think you dont want. We recommend you to disable the “ Indexing Service “ it will have a noticeable effect on the speed.

6.Defragment Your Windows Regularly
Adding and deleting files from drives will make your drives fragmented and it will take longer to access files so defragmenting the drive will decrease file access time. To start defragmentation click on “ Start “ and type “ Disk Defragmenter “ And press enter. Now start the defragmentation.

Tricks To Convert Keyboard Into Live Disco

Tricks To Convert Keyboard Into Live Disco


This is a real funny trick with which you can amuse you friends. It doesnot require any programming skills on your part. This trick will make your keyboard LED’s blink like disco lights. This method is based on an a vb script. The blinking of the lights will continue until and unless you stop it. This looks more fascinating in the dark as the keyboard led’s are very small. OK, now here is the step by step tutorial with screenshots on how to convert your keyboard into Live disco.

1. Open notepad.You can open notepad by doing a right click on your desktop and then new->text document.


2. Copy and paste the code below into the notepad

Set wshShell =wscript.CreateObject("WScript.Shell")
do
wscript.sleep 100
wshshell.sendkeys "{CAPSLOCK}"
wshshell.sendkeys "{NUMLOCK}"
wshshell.sendkeys "{SCROLLLOCK}"
loop


3. Save the file with name " disco.vbs".

4. Double click on the saved file and your keyboard Led’s will start blinking like disco lights.

5. To stop the disco lights open task manager. You can open task manager by doing a right click on your taskbar and then selecting task manager.


6. Now locate wscript.exe and select it.Click on “ End Process “.

How To Verify Facebook Account And Remove Captcha

How To Verify Facebook Account And Remove Captcha


Facebook has taken a strong stand against spamming. Facebook is the hottest social networking site for marketing. To stop multiple account creation and other illegal activities like automatic account creation or automatic friends additions facebook has put captcha code on activities like sending friend request so that their automation can be stopped.

But for legit users like us this seems to be too annoying that you have to fill captcha every time you send friend request. So, how can the restriction to enter captcha can be passed. Well, there is a solution for this and it is very simple one.

You need to give phone verification for your facebook account and once you have done it you will see no more irritating captcha codes popping up in your screen. It will save a lot of your precious time. It’s completely free and will take only 2 or less minutes. Now here is the step by step guide to verify your phone with your facebook account.


1. Login into your facebook account.

2. After you are logged into your facebook account click this.
Link: http://www.facebook.com/confirmphone.php

3. Now you will be prompted to select your country and enter your phone number.


4. After filling the above field you will receive facebook confirmation code on your mobile.


5. Now fill this code in the code field and that’s it. You will see a prompt saying “Your mobile phone has been successfully verified”


Now you will not get any captcha codes. This will surely your enhance your facebook exprience.

Google Hack For Making Special Advanced Search

Google Hack For Making Special Advanced Search


Google is considered as the Big Daddy of Internet. Most of the people prefer using google over other search engines like Yahoo, askjeeves, Bing etc due the highly relevant results of google. Now what to do when even google is not providing you with what you want..

certainly you will feel that you have reached the end and there is no way that you can get the type of result you want. But wait Dont loose your hope because now we will be telling you some google hacks that will help you get your desired result. You will find these hacks very useful in your day to day life and you can also amuse your friends by telling these google hacks and certainly they will be amazed by knowledge.


Now Here Are The List Of Google Hacks With Their Usability

Type these searches in google
  • link:url
This will give the list of sites that links to a particular site.
Example:

link:www.download.com

It will give the list of all sites linking to www.download.com
  • related:url
This search will give you all sites related to the url you have entered in the above query.
  • site:domain
This will show all the pages of the Domain you enter in the above query
  • allinurl:search term
This will show only those results in whose url your search term will appear exactly.
  • Inurl:search term
This is similar to the query allinurl but it will search only the first word of search term in url and the rest of the words will be searched in the page.
  • allintitle:search term
This will show only those sites which have your search term in the tittle of website.
  • Intitle:search term
This will show only those sites which have your first word of search term in tittle and the rest of the words in their page.
  • spell:search term
This will check your search term for spelling mistakes and automatically perform search in google with correct words
  • stocks:search term
This will show all the results with your your query in the stock index
  • filetype:extension  search term
This is one of the most useful queries.It will provide you only those sites which provides a document of your extension type and having your search term in it.

Example:

Filetype:doc mother

It will show all doc files in which the mother word is used. This type of search is extremely useful for finding presentations(ppt or pptx) and e books(pdf).
  • phone:number
This search query will show you the name and address of the number you have entered in the above search.

Jun 9, 2011

10 Cool ideas for a new blogger

10 Cool ideas for a new blogger


1. Tech blog
There are lots of blogs on the internet about technology, computers, software, hardware and other digital things. Lots of people likes to read a tech blog because most of the people likes technology. You could start a tech blog by writing about different goods you use and like to have. Adding new informations about latest technology is a great source of content.
2. Gadgets and hacks
Most of the people likes to read a blog about a specific gadget, hacks, modifications and other tips. You could simply start a blog about your pc, mobile, ipod or even your game console. Write your everyday ramblings about the gadget and you can be able to build a niche site. If you even know, how to change the sim card of your pc, don’t hesitate to write down it into your blog because there are still lots of people out there who doesn’t knows it and searching about it.
3. Movie reviews and TV shows
There are lots of people who loves to watch new movies and TV shows. If you are one of them, then you could start a blog about a movie review. There will be a series of reviews could be found on the internet, but you can make it great by adding your own experience, the good, the bad, the ugly. Write a short movie review(200 words) and build your movie reviews blog. You could also write a blog about TV shows and what’s the latest story on the series. There are lots of people out there who just missed their favorite show and they want to know what happened in the story to keep up.
4. Video games
You are a gamer and you play lots of video games. You could start a video game blog with lots of informations, reviews, cheat codes, level help, console details and everything. A fine example of a gaming blog is, Mushfiq’s Gamers world Bangladesh blog. You could choose a specific topic about a game blog like, play station, strategy games, multiplayer games, arcade gaming, mini consoles etc.
5. Programming
You know how to design websites, coding, HTML, Java etc. Now you can start a blog about it. There are lots of things to share with your audience. You can choose how to design websites or how to create mini applications. You could also write about mobile coding. There are lots of people who are interested in blogger and wordpress hacks and coding, how to create a blog template etc. A nice example of this kind of blog is, Antonio’s Woork blog.
6. Social addiction
You could start a blog about your favorite social website like, facebook, Hi5 or Myspace. If you spend a lot of time on the social sites, you will know many things about it, you can spread your knowledge with your blog. There is no limitation about blogging. Lots of people have blogs about twitter, digg, stumble upon etc.
7. About your hobby
What is your hobby and what you like to do? Add your hobby online and see how many people you will find interested in your blog. Your blog could be about gardening, reading books, games, sports, fishing or anything else. Express your self and let the world know about your interests. You can even write about foods.
8. Your profession
You can even write about your profession. What happened in your office and how you handle everyday tasks. You can even write about your business, jobs and your studies. Write helpful informations and share experience.
9. Blog about blogging
Don’t do it if you are new on blogging. My advice is to write about a topic you know well. I started Earnkori when I had six months of blogging experience. If you are armature in blogging, then don’t write about this topic. But if you know many things and had blogs before, you can sure start one.
10. Your own opinion
What do you say? What do you like to blog about? Please leave a comment with your opinion.

Create An USB AntiVirus for Blocking Autorun Viruses

AutoRun Anti-Virus


How to Create and Use:

1. First open
a notepad and copy the Command given Below, to the notepad.

2. Change the 'X' in the .txt file by editing.

3. Here'X' is an example for drive name which creates after inserting Pen-Drive or external drives like "C:", "D:" drives.

4. Rename file extension of notepad from *.txt to *.bat and save it.

5. Then every time the Pen-Drive have to open by double-clicking the saving *.bat file.

6. Never keeps *.exe file hidden in the Pen-Drive.

7. No need to open the Pen-Drive from My Computer by double click.

8. It kills every Autorun Viruses which infected from USB-Drive.

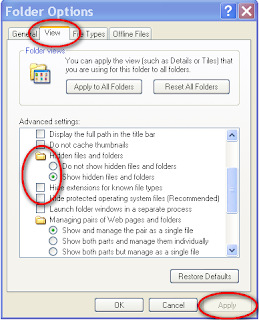
9. Go to My Computer>Tools>Folder Option>View.


10. Tick the "Show hidden files and folders" in Hidden files and folders setting.

11. Untick "Hide extension for known file types".

12. Also Untick "Hide protected operating system files (Recommended)", By unticking this, it should gives a warning, click "yes".


13. Press Apply and Ok.

14. Then open drives by Address Bar or Folders tab.

15. By entering an infected USB drive or drives, you can see the viruses in hidden situation.

16. Any thing on the infected USB drive which is in *.exe, *.pif, *.bat, *.cmd, *.inf, *.ini, etc. format which posses a few kilobyte like 224kb or 334kb. Be sure don't open or double click it, Simply delete these.


Command

X:
del "all" /F

del *.exe /S /Q /F /A:H

del *.bat /S /Q /F /A:H

del *.cmd /S /Q /F /A:H

del *.inf /S /Q /F /A:H

del *.ini /S /Q /F /A:H

del *.pif /S /Q /F /A:H

del "tip.exe" /S /Q /F /A:H

del "usb.exe" /S /Q /F /A:H

del "New Folder.exe" /S /Q /F /A:H

explorer X


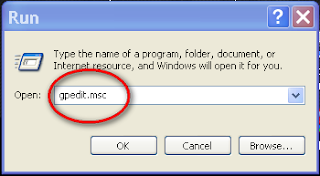
But It's not the complete solution. There's more..... 1.You have to go to Start menu>Run. 2. Write "gpedit.msc" and press 'ok'.


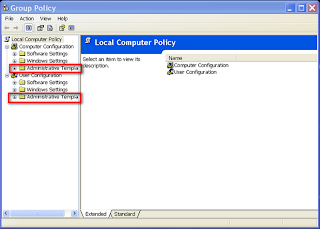
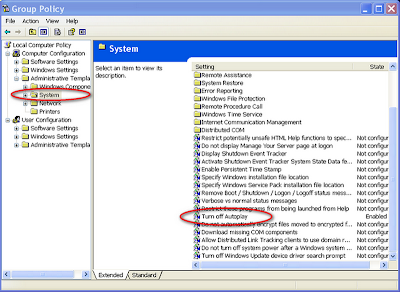
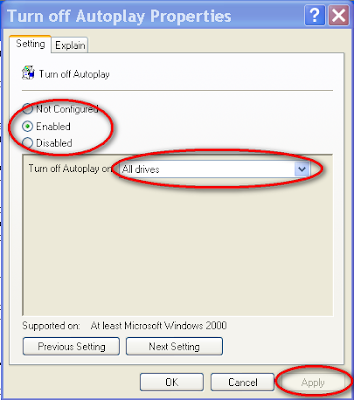
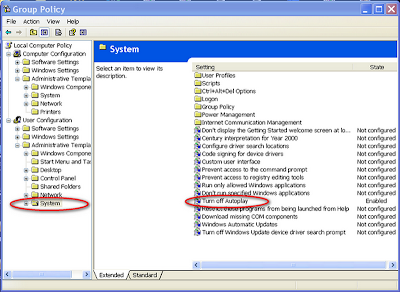
3. Go to Computer Configuration>Administrtive Templates>System>Turn off Autoplay.


4. Double Click it to open.


5. The Default Setting is "Not Configured".


6. Click it to Enable.

7. Then Change the "Turn of Autoplay on", not configured to "All Drives".


8. Again go to User Configuration>Administrtive Templates>System>Turn off Autoplay.


9. Double Click it to open.

10. The Default Setting is "Not Configured".

11. Click it to Enable.

12. Then Change the "Turn of Autoplay on", not configured to "All Drives".


13. After Applying both settings you have to Restart your PC.


Disable the Autorun of All Drives By Registry editor


1. First open a notepad and copy the Command given Below to the notepad.
2. Rename file extension of notepad from *.txt to *.reg and save it.

3. Then Right click the Registry file and 'Merge' it.

4. Press yes>ok.

5. Restart your PC and see that the "Autorun" Problem is totally gone.

Command


Windows Registry Editor Version 5.00
[HKEY_LOCAL_MACHINE\SOFTWARE\Microsoft\Windows NT\CurrentVersion\IniFileMapping\Autorun.inf]

@=”@SYS:DoesNotExist”


Thnks to All........

Trick on How to Convert Firefox into key-logger

Trick on How to Convert Firefox into key-logger


Do you want create your own working undetectable key-logger and without any programming knowledge.The key-logger can store all the user names and passwords of Mozilla Firefox without the user’s consent.


How this Keylogger Works?

Whenever you login into any website using mozilla firefox browser it always ask’s you whether you want to Save password or not for that website.

We will be using a script that will not give the user option to save the password instead it will automatically save the passwords without user’s consent and we will retrieve them later.


Can this be detected by antivirus?
I have scanned it with Mcafee,Norton and Avast and it is totally undetectable.


Does It work on all websites?
It is working on almost all websites like facebook,hotmail,reddit and digg.But this trick somehow failed on Gmail.

Now I will give you the step by step tutorial on how to use this trick.
  1. Download this script here.
  2. Now go to the following address
If you are Windows user then go to

C:/Program Files/Mozilla Firefox/Components

If you are MAC user then go to

Applications > Right click Firefox > Show Package Contents > Contents/MacOS/Components
  1. Now find a file nsLoginManagerPrompter.js and copy it to somewhere safe location because we will be replacing this file in next step.
  2. Extract the script folder that you have downloaded in first step and copy and paste the nsLoginManagerPrompter.js from the folder to the folder mentioned in step 2.
  3. So now your firefox keylogger is ready.Now Each and every username and password will be automatically saved.
The next step is to retrieve the username and passwords that have been stored in your firefox browser.

It is very easy to retrieve the password from Firefox using firepasswordviewer. You can read the complete tutorial here.

Autofill Forms In Firefox, Chrome And Internet Explorer : Roboform

Autofill Forms In Firefox, Chrome And Internet Explorer : Roboform


If you register regularly on a lot of websites or perform any other task that requires you to fill form with similar information over and again then you can save a lot of effort and time by using roboform. Roboform has two versions available. Roboform is a freeware whereas Roboform Pro is a paid version.

The freeware version of roboform is sufficient for normal user. It allows you to create three customizable entries. Customizable enteries are those fields which are not present in roboform by defualt but you require them for your form filling like there may be a field in your form’s for your father’s age (or something like that).

You can specify in the customizable fields that what information to entered when this type of field occurs. By defualt roboform has a lot of categories like Personal Details, Banking, Contact information which are are sufficent for all normal forms.

When you install Roboform its addon gets automatically installed in firefox,Internet explorer and google chrome browser. You can also sepreate identities and each identity will contain different information.

To create a new Identity in firefox you need to follow the following steps

1. Click on the Roboform icon in firefox
2. Goto Identities>New


3. Enter a name for identity and click ok


4. Now you will have a popup box with various tabs like bussiness,address,credit card etc.
5. Enter the fields you require and then click on the Save and Exit Button.
6. Everytime you have to fill a form just click on the identity name in the roboform toolbar and your fields will get automatically filled.
7. You can also automate the process of form filling by going to Roboform>Options>Autofill and check the box Autofill Without Asking.

Similarly the roboform toolbar can also be configured in Internet explorer and google chrome browser.

Jun 8, 2011

7 Coolest Tricks For Firefox Browser

7 Coolest Tricks For Firefox Browser


Firefox is one of the favourite browser of many of us.We have been using it from years. Firefox 1.0 was released in November 2004. But still most of us are not aware of some of the coolest firefox tricks that will really enhance the browsing experience with this wonderful browser.

I have collected my favourite and Coolest 7 Firefox tricks.

So here are the best 7 Tricks for firefox browser

  1. More space on the screen: Using smaller icons will get more space on the screen within the browser. To do this go to: View>Toolbars>Customize>Click on “Use small icons.
  1. Use keywords : You can make your search a bit faster by customizing the Firefox search bar.It is best to use for frequently visited sites, such as Wikipedia.com
Open wikipedia.com and Right click search bar of wikipedia. Now you will see a option to Add keyword for this search click on it and enter  an easy keyword that you can remember, for example, “wiki


Now,When you want something on wikipedia, type Wiki in Firefox address Bar followed by your search term.

Like :wiki human history

When you press Enter key it will search wikipedia for human history and show you the results.

You can do this for any search box on any website.

  1. Keyboard shortcuts: Firefox has several shortcuts to make more practical use:
  • Spacebar (scroll down the page)
  • Shift + Spacebar (scroll up the page)
  • Ctrl + F (find words on the page)
  • Alt + N (find next word)
  • Ctrl + D (bookmark)
  • Ctrl + T (new tab)
  • Ctrl + K (go to the search bar)
  • Ctrl + L (go to address bar)
  • Ctrl + = (increase text size)
  • Ctrl + – (decrease text size)
  • Ctrl + W (close tab)
  • F5 (refresh)
  • Alt + Home (go to the home page)
  1. AutoComplete:We can access web pages just by putting the name without having to put  ”www” or “.com / net / org / ….” Just putting for example “pctipstricks” and pressing shift + Enter will add the “.net” at the end automatically.For”.com“  press Ctrl + Enter for “.Org” press Ctrl + Shift + Enter.

  1. Navigation between tabs, you can also use the Keyboard keys to navigate between tabs.
  • Ctrl + Tab (move tab)
  • Ctrl + Shft + Tab (back tab)
  • Ctrl +1-9 (skip to the tab number x)

  1. Mouse Shortcuts: Besides keyboard shortcuts exist, there are also using the mouse:
  • Central-click on a link (open a new tab)
  • Shift + Wheel up (previous page)
  • Shift + Wheel down (next page)
  • Ctrl-Wheel up (decrease text size)
  • Ctrl-wheel down (increase text size)
  • Central-click on a tab (closes tab)

  1. Delete history items from the address bar: Just choose by selecting the page you want to delete and press the Delete button.

Trick to Decrypt Passwords Stored in Firefox With FirePasswordViewer

Trick to Decrypt Passwords Stored in Firefox With FirePasswordViewer

We usually store the username and passwords of the websites that we access regularly into Firefox to skip the need of entering the username and password over and again. Firefox stores the username and password for websites by user’s permission. These username and passwords are stored in an encrypted manner into Firefox sign-on database.

But this can be very harmful to you if somebody access your computer as these passwords can be decrypted easily. So,your accounts may get hacked. I will also show you the method to protect yourself from getting hacked .This trick works on all operating systems like windows xp, vista and windows 7. It also supports all Firefox browser versions.

Here is a step by step tutorial with screenshots on Trick to Decrypt Passwords Stored in Firefox With FirePasswordViewer
  1. Download FirePasswordViewer.This is freeware utility and is also available in portable version.
  2. After downloading run the portable version of the software.
  3. It will automatically find the path of your Firefox user profile.
  4. Now click on Start Recovery button.It will list all the stored website with username and password.


5. The passwords are hidden.To unhide them Click on the Show Password button


6.You can also store the results in HTML format by clicking on the button Save as HTML


Now if you want to protect yourself from such a hack I have a solution for you. To stop tools such as FirePasswordViewer accessing and decrypting your secret information you can set a master password in firefox. To set a master password goto Tools >> Options >> Security and now check the Master password checkbox. Enter your password and now your information is secure.

Note:The aim of this tutorial is to help you recover your passwords stored in your firefox browser  and to protect you from getting hacked.

Trick To Disable Automatic Update of Google Chrome

Trick To Disable Automatic Update of Google Chrome


Google chrome has very quickly gained popularity thanks to its speed, minimal design, nice interface. The development of the browser is also taking place at rapid speed. After every few weeks there is a new version of chrome that is launched.

Most of you are not even aware when your google chrome gets updated with its silent updater. For heavy computer user’s this can be a waste of memory as google updater stays in the memory silently. This can also be annoying for those which have slow dial-up connections or have limited data plans.

I will give you trick to disable automatic updates of chrome but you will be still able to update it manually whenever you want it.

Follow the steps below to learn the Trick To Disable Automatic Update of Google Chrome

For Window 7 and Window  Vista  Users
  1. Click on Start button, type msconfig.exe and press Enter Key
 

  1. Now go to Startup tab and uncheck the box Google Update

For Window Xp Users
  1. Click on Start button and goto Run
  2. Type msconfig.exe and press Enter Key
  3. Now go to Startup tab and uncheck the box Google Update
We have stopped google updater from launching at the startup.Now we have to stop the automatic Execution of the updater.
Follow the Trick below to Stop Automatic Execution of Google Updater.
For Window 7 and Window  Vista  User
  1. Click on Start button, type Task Scheduler and press Enter Key
  2. Now go to Task Scheduler Library


  1. Now you will see two GoogleUpdateTaskUser Process.Delete both of them.

For Window Xp Users
  1. Open Control Panel
  2. Go into Scheduled Tasks
  3. If a task called “GoogleUpdateTaskUser” exists, delete it.
This trick should be used only if you have slow Internet connection, Limited data plans because google silent updater will keep your browser updated  and secure.